Converting Movies for iPod
{This post was updated in May 2011 with things I've learned over the last year.}
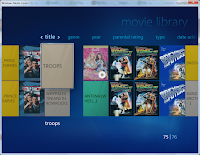
Once you've converted them, the movies can also be streamed via AppleTV (or equivalent) and watched on your main TV as well, so it's a great single format to do everything in.
 There are some very good pay packages that can copy the DVD files (you can't just copy them from the DVD and paste onto your PC hard drive), but there are some good ones that are free as well. The free one that I have settled on is called DVDFab. It's a full-feature program that can do the converting all the way down to the iPod/AppleTV, but that part is trial-only and is pretty spendy to purchase. There's also an embedded free mode (called DVD Decrypter) in the product that just copies the DVD files from one place to another without converting them.
After researching how best to get this done, I have settled on a few tricks and free tools and work pretty well. Several of you have asked me how to do it, so read on (look for a separate post for converting recorded TV shows):
Steps to Convert Movies
To convert movies to iPod or AppleTV, you need to convert the DVD files (stored natively as .VOB files) into either .MP4 or .M4V files, which is what Apple uses. A typical movie takes up to 4-5GB of space on a DVD, usually spanned across several VOB files. Usually, a single VOB file represents the main movie, with the other VOB files being special features and such. There are a number of tools you can use to play with these files, though the MPAA has tried to quash many of them for piracy fears. The files are encrypted so you can't just copy them from one place to another with any expectation of success.
By the way, the steps below focus primarily on Windows PC's. Mac options vary, but it seems that there's more packaged software out there that does the whole thing for you at a reasonable price. For example, you might look at RipIt (but I haven't used it).
By the way, the steps below focus primarily on Windows PC's. Mac options vary, but it seems that there's more packaged software out there that does the whole thing for you at a reasonable price. For example, you might look at RipIt (but I haven't used it).
Step 1: Copy the DVD Files
Before I go any further, you should know that you really don't have to copy (rip) the DVD files to your computer if all you want is an iPod/AppleTV version of a show. You can go straight to that (see step 3). However, since kids like to scratch and trash DVD's, this is a good way to keep a safe copy of the stuff before it gets broken. Besides, once it's copied, you can use Windows Media Center (included in Vista and Win7) to watch the ripped version. If you have a media extender (something like the Linksys DMA2100 or even an XBox), you can even watch the ripped version on your TV and skip the disks all together (though there are some restrictions that can make it a pain)!
But the best reason to start with copying the files to your PC is that the conversion process is much quicker when done in a couple of separate stages.
Step 1a: Rip the Movie
 There are some very good pay packages that can copy the DVD files (you can't just copy them from the DVD and paste onto your PC hard drive), but there are some good ones that are free as well. The free one that I have settled on is called DVDFab. It's a full-feature program that can do the converting all the way down to the iPod/AppleTV, but that part is trial-only and is pretty spendy to purchase. There's also an embedded free mode (called DVD Decrypter) in the product that just copies the DVD files from one place to another without converting them.
DVDFab will remove the FBI warnings and all the you-can't-skip-me content. You can also choose to copy only the main movie and drop all the extra soundtracks and such, which should lower the space required by quite a bit.
Download DVDFab for Windows
Download Mac the Ripper for Mac (not described here, and very old, but free)
Once you get it installed, the free portion is called DVD Decrypter or DVD-to-DVD. Select the source as the DVD disc and the target as a location where it should copy the content. Then select on the left side to copy the main movie only (unless it's a series disc that has multiple VOB files that you want copied.)
Uncheck all the extra languages for captions and soundtracks on the right side (usually only the very top English box should remain checked).
Step 1b: Get MyMovies (if you wish to catalog the originals)
This step is completely unrelated to converting movies for iPod, but once you've copied your DVD's to your PC, you might as well categorize them all nicely. This is especially useful if you want to use a Windows Media Extender (like an Xbox) to watch them on a remote TV. However, if you're going to use AppleTV, it will use the same format (mp4 or m4v) that iPod's use, so you can skip this stuff.
There's another free product called MyMovies that will automatically catalog, download cover art, and get all the info for Windows Media Center to make your movies show up pretty. Easy setup, and it automatically picks up new movies as you add them.
NOTE: It appears that MyMovies can copy DVDs to PC as well, though I haven't tried the feature there, and DVDFab has more options for tweaking what parts get copied.
Step 2: Transcode the VOB (DVD version) file to MP4 (iPod version).
This is the main step.
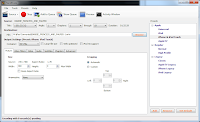
As mentioned above, DVDFab can do this in one step for you, but it's part of the for-purchase features. Another free and easy-to-use product is called Handbrake. Handbrake can read directly from DVD disc, but can also read your ripped movie if you copied it above. If you read directly from the DVD, it seems to be MUCH slower, and it can have issues with decrypting the DVD if you don't have the right dependent software installed. It's simply easier, in my opinion, to do the two-phased approach discussed here.
Download Handbrake (Windows or Mac)
Handbrake can queue up lists of files to convert, which is nice if you want to set it to run overnight while you're not using the computer. So start by copying a number of movies to a temp folder on your PC, and then queue up the conversion to run as a batch.
The interface is pretty straight forward. Just select the source via the upper-left button; it should be the directory where the copied movie is located). Then the output-file location. Choose which title to convert (it will preselect the longest one on the disc, which is usually sufficient), and then choose iPhone/iTouch/iPad/AppleTV (or whatever type preferred) on the right-side presets to get all the settings for how it should be converted. Then add to the queue or run the single job. The conversion will take anywhere from 20-45 minutes normally (based on my multi-core machine). Movie-length output files for iPod formats are typically in the 500mb range and AppleTV is about 1GB or so.
You can test your output file by opening it. It should play smoothly in your media player, but with a smaller format than the original files (which can go full screen easily).
Step 3: Add Tags to Your Movies
Your new MP4 files will play just fine but do not have all the meta-tags that programs such as iTunes use to determine name, rating, description, etc. You also won't have cover artwork, which is really nice to have. You could add all the tags by hand in iTunes, but that's really slow. The solution is to run the files through a tagging utility that compares the titles to Amazon titles and then pulls the info over and applies it to your files.
For Mac, I recommend iDentify 2. For Windows, I recommend MetaX. These programs will quickly take your files and add appropriate tags from several different sources on the web. Once tagged, iTunes will see the "album art" and all other info. They will even update iTunes immediately.
See the linked sites for directions, but in a nutshell, you open the new tagless files and then do a search for the best match (usually off Amazon). Then when you double-click the match, it will apply those tags to your file. I've found that I need to check the artwork field manually in most cases to get it to update. Repeat this for all your new movies. Then click the "Write Queue" button and it will write all the updates at once and import them into iTunes.
Be sure to correctly choose "TV Show" or "Movie" when you tag the new files, or they may show up incorrectly in iTunes (but that's easily fixed with a right-click -> Get Info -> Options -> Media Kind update on the item in iTunes.)
Step 4: Import to iTunes and Copy to iPod/iPhone
If you used MetaX above, this step will have already been completed for you automatically.

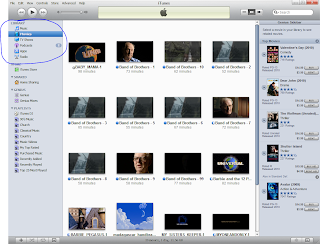
Once you have the mp4 files ready to go. You need to import them into iTunes. The simplest way to do this is to drag and drop them onto the "LIBRARY" section of the left-side pane.
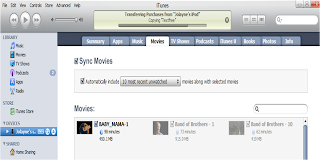
Once it's in your library, hook up your device and click on the Movies tab in the sync settings. Then choose how many movies and what type you want to sync to the device. Click Apply at the bottom and it will send the new files over and you're ready to watch.
Incidentally, you can choose to have only unwatched movies on your device. A movie is considered unwatched until you get to the very very end of it. You'll see circle icons in the list of available movies. A whole circle means unwatched, half circle means partially watched, and empty circle means completely watched. If you set it up right, you can have it automatically cycle through the movies as you watch them without having to do settings each time.
That's it! Not bad at all.


Comments